Showing posts with label Dollar Tree. Show all posts

Monday, November 3, 2014

Our Halloween Costume REVEAL!!

Happy Monday ya'll!
 
I hope everyone had a great Halloween weekend filled with family, friends,
trick-or-treating, parties and of course ..... CANDY!!
 
I'm not sure which I like more, seeing my girls all excited and dressed up or watching them handout candy to fellow trick-or-treaters.  They are totally into seeing all the other costumes and literally fight over who gets to handout the candy each time.  Gotta say, I love their enthusiasm :)
 
Like I shared in my last post, our costumes this year came together VERY last minute.
 
We're talking the day-of.  With coffee in hand, I was still putting together the finishing touches on Halloween morning.
 
In the end, I just love how they turned out!  It was so nice seeing them feel confident enough to go out looking totally and completely NERDY {and totally and completely adorable too}!
 
 
Before I get to our nerd costumes, I wanted to show you the quick and easy deer costume I put together for a Halloween party the hubs and I went to. 
 
What you'll need is a really big mens t-shirt.  Your size and height will determine what size t-shirt will work best.  I picked mine up at the local Goodwill for $3.49.  It was an XXLT which worked perfectly because it was long enough to be a dress without having to make any adjustments.   
 
Wash and dry your shirt then lay it out on a flat surface.  Next, take a dress you already own, a form fitting tank dress works best, and lay it on the t-shirt.  {If you don't have a tank dress you can use a tank top too}.  Now just trace the dress onto the t-shirt.  Here's what you should end up with.  Sorry about the lack of pics, I'm lucky I remembered to take even these two!
 
 
I pinned the shirt together to keep it from moving when I cut it.


I used Photoshop to darken my trace line so you can see it better.
 
Ok, now all you need to do is cut out the 'dress' on the trace line and then sew!  REMEMBER, depending on how much stretch your t-shirt has and how tight you want the finished dress to be, you may need to add a seam allowance.
 
And now, the finished product!!


I added some faux fur spots on the side and to the bust, and made some giant ears out of that same fur, some felt, a few pipe cleaners and a headband we already had.  The dress was SO EASY to make and came out perfect!  And it was super comfy!!
 
{I apologize for the blurry pic!!  That's what happens when you're running 30 minutes late, have to drop the littles at Grandmas and the only camera you remebered is the one on your phone.  Lame.}
 
 
No doe is complete without some spots on the booty and of course a tail! ;)


Here's the hunter and I :)


The make-up was super easy and I was able to do it with stuff I already had, that was a total bonus!
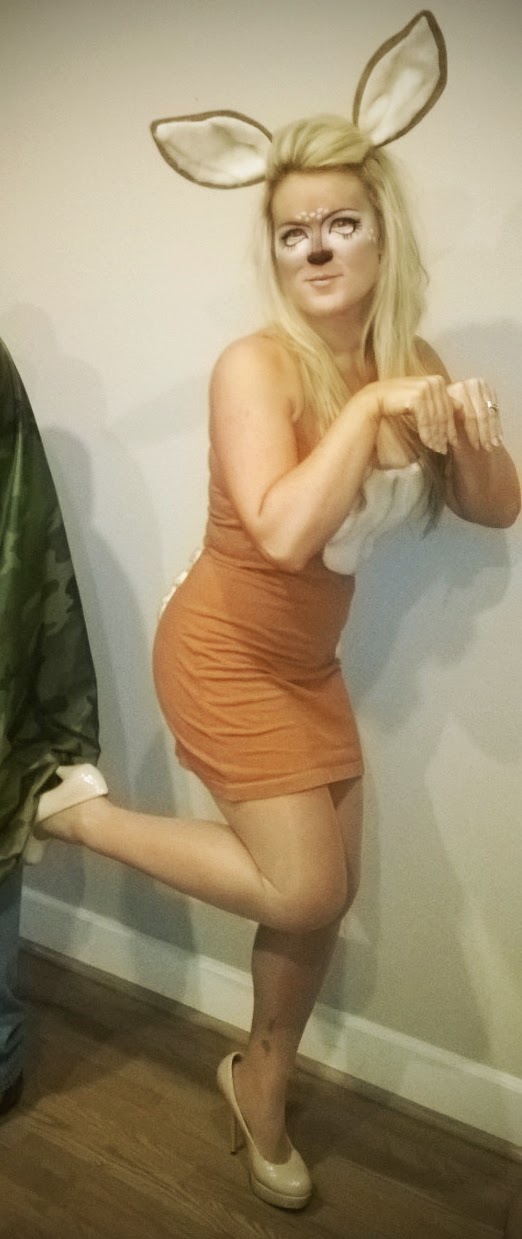


The total cost for this costume was less than $10!!


Alright, time to get nerdy!
 
After the girls FINALLY decided what they wanted to be for Halloween I went to my favorite local thrift shop.  Every Wednesday is 1/2 price day and I was able to pick up these plaid shirts for $2 each. 
 
 
I made some 'modifications' and ......
 
VOILA!
 
 
Totally nerdy plaid skirts!  We even managed to find the white shirts there on 1/2 price day too!  I made the bowties out of the shirts as well, and attached some DIY suspenders.  We picked up the tube socks at DollarTree and found the nerd glasses {with the exception of Miss B's real specs} in the dollar section at Target. 


No nerd is complete without their headgear!  I made the headgear out of a wire hanger, some elastic and some foam.  It was my favorite part of the costumes.  I think she looks so cute!  And she was beyond committed to staying 'in character'.  We took them out to dinner and she kept the headgear on the whole time!  That's my girl :)
 
 
The girls love it when I dress up with them, and let's be honest, it doesn't take much convincing :) , so I threw together a quick nerd outfit and off we went!  {Should I be concerned that it was so easy to find nerd attire in my own closet??}


Thanks so much for reading! I hope you enjoyed the costumes! 
 
Have a great day, and don't forget to follow my blog, pin the pics and like my Facebook page! 
 
Thanks a million!
 
Jessica


Thursday, June 21, 2012

Avengers Superhero Birthday

M and I celebrated our tenth wedding anniversary last month.  You know the saying “time flies when you’re having fun”?  Well, the past ten years have traveled at warp speed.  I know it’s not just because they’ve been fun, but because I’ve be fortunate enough to spend them with a man that I couldn’t love more.


Apparently he’s quite the little party planner as well.  Unbeknownst to me, he had secretly been planning an anniversary party for 2 months, a party that was actually a vow renewal ceremony complete with several of the original wedding party cast members and even a wedding cake.
It was so amazing.

Thank you from the bottom of my heart to ALL who helped……and didn’t spill the beans J 
I’ve slightly digressed. 
M and I had planned a little trip to toast our 10 blissful years, and as it turns out, some of our dear friends would be toasting with us.
{Come to think of it, we did a lot of toasting that weekend.  Mmmmm.  Wine.} 
At lunch on our way outta town, we were chatting away with our friends and their sons birthday came up.  I, of course, perked right up and began grilling her on all the party details.
 Where?
 When?
 Theme?

As it turns out, he’s a big Avengers fan.
That was all I needed to hear.
A couple of trips to the store later that week {I forgot to mention that we had the chat about his party only ONE WEEK before said party} and a rummage through my party stash, and we were ready to save the world, or whatever it is the Avengers do.
I have girls.
Sorry.  I’m clueless when it comes to superheros. 
Sadly, I forgot my camera the day of the party and was stuck taking pics with my phone.  It’s supposed to be a smartphone, it’s not.  It doesn’t take the best pics, but when it’s all you have, it’s all you have.  Sorry for the poor quality, BUT even with my crappy pics, you can still see how cute everything turned out.

Through the magic of Photoshop, I made this poster to look kinda like a comic book cover.  Look closely.  It’s the birthday boy’s face!
 

We grabbed lots of red, white and blue décor items from Dollar Tree.

I covered a shoe box with white butcher paper then glued on tons of small black squares to resemble and skyscraper.  We put the Avenger cast around the building.  Hulk was actually hanging from the side, and Iron Man was flying {with the help of fishing line} above.
They had the AWESOME Captain America shield.  We hung it by the front door and put out masks for the guest to wear.
 

Using the same graphic that is on the poster, I made these cupcake toppers.


The kids and even the parents dressed up.  It was so cute!


Thanks for letting me be a part of your party Spencer!  Happy Birthday!!

Thursday, May 24, 2012

Pool Party!


My two oldest girls recently celebrated their birthdays.

This was a big deal not just because my babies are growing up, but because they decided NOT to have their party at our house.

At first I was sad about the party scene leaving our place, then it hit me.

 The mess would be someone elses ..... and I was liking the sound of that. 

There was just one problem.

How would I set up a cute party in 30 minutes??? 

The answer:  keep things simple.


Using some scrap plywood and ripped down 2X4's, M built me a tiki hut that I could set on top of our six foot table.

I stained it, painted on some surfboard-ish stripes, added at thatch roof {made from Dollar Tree grass skirts} and styled it up with a mix of store bought and homemade decorations.


I made this chalkboard menu with an old calendar holder and a scrap piece of wood.

It's super easy.

Just spray paint the frame any color and use chalkboard spray paint {I picked mine up at WalMart for less than 4 bucks} to spray paint your scrap wood.

That's it!


We made the drink stand with a galvanized tub and an old wrought iron table base.

Just attach them together with some nuts, bolts and washers.

I picked up the tub and table base at Digger, so my drink stand only cost me a total of $3!!!

Can't beat that!


Follow these simple guidelines, and even the cutest of swimmers won't be able to resist your food table :)


 Used my homemade cupcake stand, yet again.

This thing has REALLY come in handy.  Everyone needs one of these babies.


Our first 'away' party went great!

The girls had the best time and so did I.

Coming home to a clean house was a major gift to myself.

Thanks for reading!

I'd love it if you'd follow, share and pin :)

Have a great holiday weekend!

Wednesday, March 14, 2012

A Chocolate Tree For Miss B

If in the past 6 months you’ve visited our house, saw us at school, ran into us at the grocery store or bumped into us in the public bathroom, then you’ve heard this:

 “I’mGonnaHaveAChocolateTreeAtMyBirthdayISoEsscited!!!”

 Translation? Yes, please.

 “I’m going to have a chocolate tree at my birthday!  I’m so excited!”

Believe it or not, my now 3 year old has been saying that for over 6 months!  After being inspired by her L.O.V.E of chocolate and a specific episode of Dora that involves a singing and dancing chocolate tree, the ‘Chocolate Tree Birthday’ was born.

{Don’t worry; I worked some bacon in there too.  For those of you that know the birthday girl, you know what I’m talking about}. ;)

M came to my rescue again.  I told him about my ideas for this chocolate tree that I’d been dreaming up.  The plan was my take on those vinyl tree decals for walls that have shelves you can hang where the branches would be.  We took that concept and tweaked it a little.  We made the whole thing out of wood and made it free-standing.  First I made a tree shaped pattern and traced it on the plywood.  He did the cutting, then I got to painting.  The end result was perfect.  How could we tell?  When the birthday girls saw it she squealed “is that my chocolate tree”?  Yep.  Perfection.

 Add 26,573 lbs. of chocolate candy, cake pops, cupcakes, milk and birthday cake, and you’ve about summed up the party.  I hope you enjoy all the pics…….we only took OVER 500.  Ridiculous, seriously ridiculous.


Here she is in all her glory.  I used the tree to display cake pops {I glued paper flowers onto the sticks to
look like blossoms on the tree}, Hershey Kiss acorns and chocolate dipped strawberries.

This was the drink station.  We served up ice cold milk {both plain and chocolate}, some
chocolate wine for the mommies and daddies and good ol' water.

I added "milk mustaches" to the straws that coordinated with whatever flavor milk you were drinking.


The chocolate/vanilla swirl marshmallows looking lovely under a glass dome.

I got these for M.  I think they are beyond nasty, but he loves them so here they are.

I used the paint stick crates {made for this party} to add some different heights to the table.

Cute lil' minis.

The GORGEOUS cake my mom made.  Her talent disgusts me.

A giant, we're talking 24X36, photo I had printed of the birthday girl.  I mounted it to a sheet of styrofoam insulation and finished off the edges with some brown satin ribbon.  Keep scrolling down for better pics of it.


Yes, you read that right.  Bacon, toffee and chocolate.  It was actually REALLY good.
The white apothecary jar on the right was made with an old pickle jar, a Dollar Tree
candlestick and a wooden finial!

I just love the cake.  Found the 'B' at Michael's.  Glued some wooden skewers
to the back and BAM! instant cake topper.


I designed these subway style prints and mounted them to foam board.
They looked great over the drink station.


Happy Birthday to my sweet baby girl.  Love you.
She had a great time and, are you ready for this, is already talking about her next birthday!  She's telling anyone and everyone that she's having a red birthday cake.  Hmmmm......better get to planning, only have 360 days till she turns 4! :)

Have a great rest of the week and thanks for reading!