Showing posts with label Halloween. Show all posts

Monday, November 3, 2014

Our Halloween Costume REVEAL!!

Happy Monday ya'll!
 
I hope everyone had a great Halloween weekend filled with family, friends,
trick-or-treating, parties and of course ..... CANDY!!
 
I'm not sure which I like more, seeing my girls all excited and dressed up or watching them handout candy to fellow trick-or-treaters.  They are totally into seeing all the other costumes and literally fight over who gets to handout the candy each time.  Gotta say, I love their enthusiasm :)
 
Like I shared in my last post, our costumes this year came together VERY last minute.
 
We're talking the day-of.  With coffee in hand, I was still putting together the finishing touches on Halloween morning.
 
In the end, I just love how they turned out!  It was so nice seeing them feel confident enough to go out looking totally and completely NERDY {and totally and completely adorable too}!
 
 
Before I get to our nerd costumes, I wanted to show you the quick and easy deer costume I put together for a Halloween party the hubs and I went to. 
 
What you'll need is a really big mens t-shirt.  Your size and height will determine what size t-shirt will work best.  I picked mine up at the local Goodwill for $3.49.  It was an XXLT which worked perfectly because it was long enough to be a dress without having to make any adjustments.   
 
Wash and dry your shirt then lay it out on a flat surface.  Next, take a dress you already own, a form fitting tank dress works best, and lay it on the t-shirt.  {If you don't have a tank dress you can use a tank top too}.  Now just trace the dress onto the t-shirt.  Here's what you should end up with.  Sorry about the lack of pics, I'm lucky I remembered to take even these two!
 
 
I pinned the shirt together to keep it from moving when I cut it.


I used Photoshop to darken my trace line so you can see it better.
 
Ok, now all you need to do is cut out the 'dress' on the trace line and then sew!  REMEMBER, depending on how much stretch your t-shirt has and how tight you want the finished dress to be, you may need to add a seam allowance.
 
And now, the finished product!!


I added some faux fur spots on the side and to the bust, and made some giant ears out of that same fur, some felt, a few pipe cleaners and a headband we already had.  The dress was SO EASY to make and came out perfect!  And it was super comfy!!
 
{I apologize for the blurry pic!!  That's what happens when you're running 30 minutes late, have to drop the littles at Grandmas and the only camera you remebered is the one on your phone.  Lame.}
 
 
No doe is complete without some spots on the booty and of course a tail! ;)


Here's the hunter and I :)


The make-up was super easy and I was able to do it with stuff I already had, that was a total bonus!


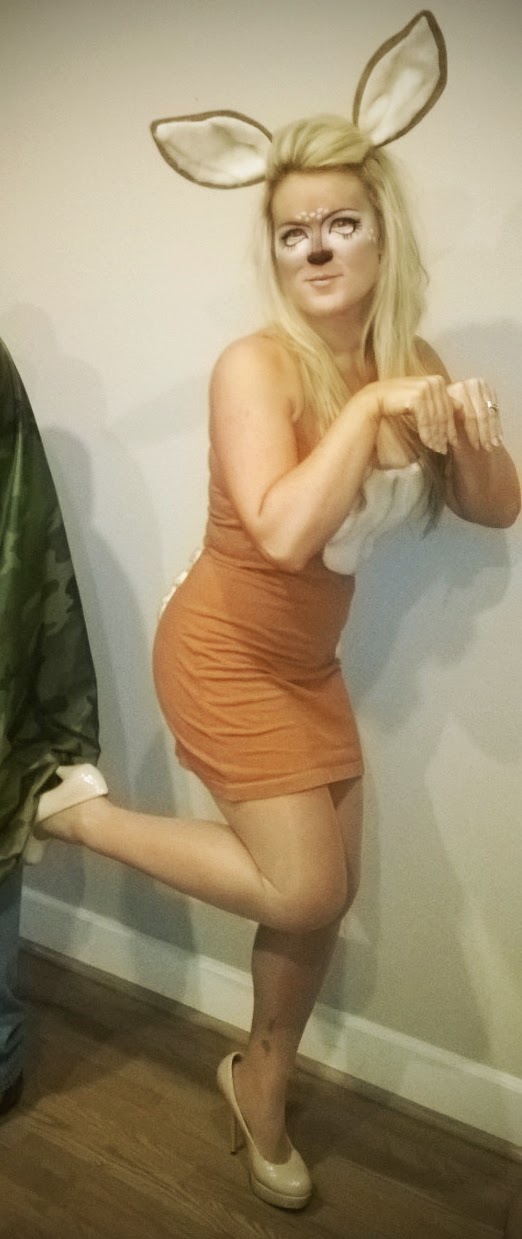
The total cost for this costume was less than $10!!


Alright, time to get nerdy!
 
After the girls FINALLY decided what they wanted to be for Halloween I went to my favorite local thrift shop.  Every Wednesday is 1/2 price day and I was able to pick up these plaid shirts for $2 each. 
 
 
I made some 'modifications' and ......
 
VOILA!
 
 
Totally nerdy plaid skirts!  We even managed to find the white shirts there on 1/2 price day too!  I made the bowties out of the shirts as well, and attached some DIY suspenders.  We picked up the tube socks at DollarTree and found the nerd glasses {with the exception of Miss B's real specs} in the dollar section at Target. 


No nerd is complete without their headgear!  I made the headgear out of a wire hanger, some elastic and some foam.  It was my favorite part of the costumes.  I think she looks so cute!  And she was beyond committed to staying 'in character'.  We took them out to dinner and she kept the headgear on the whole time!  That's my girl :)
 
 
The girls love it when I dress up with them, and let's be honest, it doesn't take much convincing :) , so I threw together a quick nerd outfit and off we went!  {Should I be concerned that it was so easy to find nerd attire in my own closet??}


Thanks so much for reading! I hope you enjoyed the costumes! 
 
Have a great day, and don't forget to follow my blog, pin the pics and like my Facebook page! 
 
Thanks a million!
 
Jessica


Friday, October 24, 2014

Halloween Decor Ideas

One week.
 
That's it.  There's only one week till Halloween.  I'm usually really good about having the girls costumes done long before this time, but for whatever reason, this year we're just getting started.
 
I did, however, manage to get the house decorated.  We never have trick-or-treaters {you'd have to be nuts to walk down our street in the dark} so I just stick to decorating the inside.
 
The girls love it when they see me getting the orange and black storage bins out of the shop.
 
I'm not sure which gets them more excited, the Halloween decorations or the fact that the Halloween decorations mean Christmas is right around the corner.  :)
 
If you haven' t gotten around to decorating yet, it's not too late!  Hopefully these pics of how I decorated our house will inspire you to add a little creepiness to your own home. 


If you saw something you liked, I'd love it if you'd pin it or share this post on your Facebook page.  Now, back to work on the Halloween costumes, I can't wait to show them to you ....... once they're done :)
 
Have a great weekend!
 
Jessica


Monday, October 31, 2011

HAPPY HALLOWEEN!

HAPPY HALLOWEEN!!

It’s finally here!

The one day a year I let myself indulge in all the candyliciousness I can get my hands on……..and not feel horribly guilty about it.

{Only mildly guilty}.

Last week we got out sweet tooth’s warmed up for this glorious occasion with some cake pops. Shockingly it was my first attempt at making them.

Even more shockingly, I hadn’t waited till I HAD to make them for some party or event before giving it a go.

Typically this is a little more my style,

“Oh, sure! I’d love to make some cake pops for your beautiful baby’s first birthday where you’ll have trillions of your closest family and friends and will be telling EVERY.ONE. who made the cake pops for you!”

{Me in the kitchen the night before the party}

“ #$*&@#!% ^&*%$#@!!!!!! “

You get the picture :)


Whatever I’m making always turns out {thank God}, but I’d forgotten what it was like to have a stress free, and FUN, baking experience.
These were just for us, who cares what they end up looking like.

{Ok, me. I care. I really, Really, REALLY care. And if they’d have turned out horribly misshapen and ugly I wouldn’t be posting about them}.

“Huh? Nope. I didn’t make any cake pops. You must be thinking of someone else”.

But I’m happy to say….

“Yes! I MADE THESE!”

They turned out really cute! Not perfect, but for a first attempt I was really pleased, AND surprised how easy they were.

Take a peek at my Mummy & Monster Pops.


I hope you enjoyed to pics! I’d love to hear about your adventures in Cake Popping and hope that you and your families have a great Halloween.


Thanks so much for reading!


Friday, October 21, 2011

Halloween Decorations at Our House

T-minus 10 days and counting till Halloween! Yippee!!


I love Halloween.


Not sure if it’s because it’s an excuse for me to dress up OR because my girls collect mountains of candy……that I get to “inspect”. Can you believe they don’t like Tootsie Rolls?! Could I produce a child that doesn’t like Tootsie Rolls?! Apparently I can. And did. 3 times. :)


I thought I’d share with all of you fine people some of the ways I’ve decorated for this fun holiday.


I wanted to keep things fairly monochromatic this year, so I mostly used black {of course}, white, off-white and bronze.


Take a look.


Let me know what you think.


I’d love to hear about how you’ve decorated.


I made this spider egg sack with batting, cheese cloth, hot glue and lots of little black plastic spiders.


May not be as realistic as one you'd buy, BUT it's waaaaaay cheaper! High five!!


A black crow I picked up at, yep, you guessed it, Dollar Tree.


I perched it on some old glass bottles I have in my dining room.


A Dollar Tree rat. Got this guy on a recent Vegas trip.


Yes, I just admitted to going to Dollar Tree while in Las Vegas. Why gamble when you can buy something this freakin' cool for only a buck!


This spider started out a glow-in-the-dark whiteish color.


Wasn't working for me.


A little black spray paint and we're good to go.


Add a revamped Dollar Tree pumpkin, and put it all under a glass dome.


{keep reading and you'll see a better pic of the pumpkin and hear what I did to it}


Here's a shot of the mantle.


Some more cheese cloth with little black spiders, a couple of bronze color pumpkins, a black crow and a GIANT spider.


I love it!


Btw, I picked up the spider in the "dollar section" at Target for only $2.50!


This arrangement is inside my fireplace on a mirrored tray.


I got some wood logs from our wood pile, scraped off the bark and cut them in various sizes.


Add some faux pumpkins and candles for a great {and easy} fall/Halloween look that'll work all the way into Thanksgiving.


I added these rubber spiders every so often around the living room.


They actually work pretty good at freaking you out.


Just ask my girls, they're always scaring each other with them.


Here's the revamped Dollar Tree pumpkin I talked about earlier.


You may have seen these at Dollar Tree.


They had some aesthetically UNpleasing silk/plastic "arrangement" {if you can even call it that} coming out the top.


I ripped that crap out as soon and I got them home, then painted them an off white.


I made the stem out of some rope, using hot glue to build it and secure it to the pumpkin.


These faux pumpkins started out bright orange but some off white paint fixed them right up.


I stacked them on top of each other, put them out by the front door and voila!


I hope you enjoyed the pics and maybe even got some ideas for a little last minute decorating in your own home.


Thanks for reading!


I’d love it if you’d consider following and sharing with your friends.

Have a GREAT weekend!